As an Amazon Associate I earn from qualifying purchases.
This post contains affiliate links.
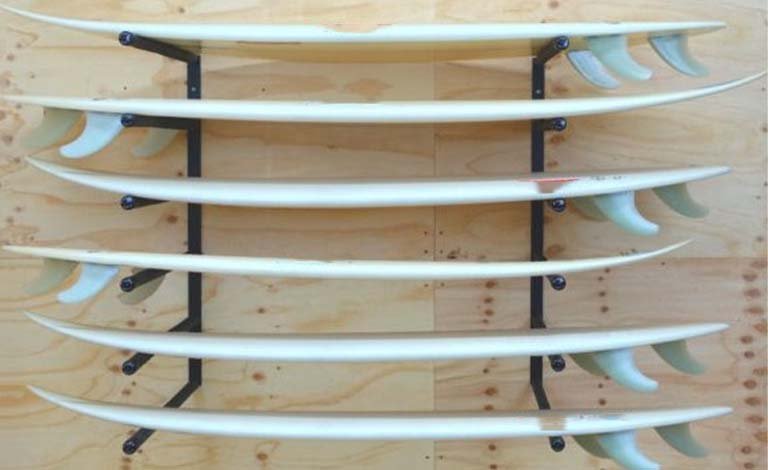
Having a safe and stylish storage solution for your board is essential. In this guide, we’ll delve into the art of build your own surfboard wall rack. Not only will you learn How to Build a Surfboard Wall Rack and how to securely mount your board on the wall, but you’ll also discover how to add a personal touch to your surfboard storage setup. From selecting the right materials to step-by-step construction tips, we’ve got you covered.

So grab your tools and get ready to embark on a DIY adventure that will not only showcase your surfboard but also reflect your passion for the waves.
Planning Your Surfboard Wall Rack
Before diving into construction, it’s crucial to plan your surfboard wall rack thoroughly. Consider factors such as the number of boards you’ll be storing, available wall space, and aesthetic preferences. Here’s how to get started:
Assessing Your Needs:
Begin by taking inventory of your surfboard collection. How many boards do you own? Are they longboards, shortboards, or a mix of both? Understanding your storage requirements will guide the design and dimensions of your wall rack.
Measuring Available Space:
Measure the area where you intend to mount the rack. Ensure there’s enough clearance for your boards, accounting for their length and width. Consider the proximity to other furniture or fixtures to avoid any obstructions.
Choosing a Design:
Explore various surfboard rack designs, from minimalist wall mounts to multi-tiered racks. Take inspiration from existing designs or customize your own to suit your space and style preferences.
Gathering Materials and Tools
Now that you’ve finalized your rack design, it’s time to gather the necessary materials and tools. Here’s a list of what you’ll need:
Materials:
- Wood planks or PVC pipes for the rack structure
- Screws, bolts, and washers for assembly
- Wall anchors or studs for mounting
- Padding or foam to protect your boards
- Paint or stain for finishing (optional)

Tools:
- Saw for cutting wood or PVC
- Drill with drill bits
- Screwdriver or screw gun
- Measuring tape and level
- Sandpaper for smoothing edges
- Paintbrushes or rollers (if painting or staining)
Constructing Your Surfboard Wall Rack
With your materials and tools ready, it’s time to start building your surfboard wall rack. Follow these steps for a sturdy and functional rack:
Cutting the Materials:
If using wood, measure and cut the planks according to your rack design. Ensure precise cuts to achieve a neat and symmetrical result. If using PVC pipes, cut them to the desired lengths using a saw.
Assembling the Rack Structure:
Assemble the wood planks or PVC pipes into the desired configuration for your rack. Use screws, bolts, and washers to secure the pieces together firmly. Double-check measurements and alignment to ensure a stable structure.
Adding Padding or Foam:
Attach padding or foam to the rack where your surfboards will rest. This will prevent scratches and dings while providing a cushioned surface for your boards. Secure the padding in place using adhesive or zip ties.
Mounting Your Surfboard Wall Rack
Now that your rack is constructed, it’s time to mount it securely to the wall. Follow these steps for a safe and stable installation:
Locating Wall Studs:
Use a stud finder to locate the wall studs where you’ll be mounting the rack. If unable to find studs, use wall anchors designed for heavy-duty mounting.
Positioning the Rack:
Hold the rack against the wall at the desired height and orientation. Use a level to ensure the rack is straight and aligned properly.
Attaching the Rack to the Wall:
Using screws or bolts, secure the rack to the wall studs or wall anchors. Ensure each screw is tightened securely to support the weight of your surfboards.
Organizing Your Surfboard Wall Rack
With your surfboard wall rack securely mounted, it’s time to organize your boards for easy access and visual appeal. Here are some tips for arranging your quiver:
Displaying Your Boards:
Arrange your surfboards on the rack in a visually pleasing manner. Consider alternating between different board sizes or arranging them by color or design for added aesthetic appeal.
Maximizing Space:
If space permits, consider adding additional hooks or racks for storing accessories such as leashes, fins, or wetsuits. Utilize vertical space to maximize storage capacity while keeping your surf gear organized.
Regular Maintenance:
Periodically check your surfboard wall rack for any signs of wear or damage. Tighten screws or bolts as needed, and replace padding or foam if it becomes worn or damaged.
In conclusion, building a surfboard wall rack is a rewarding project for any surf enthusiast. Not only does it provide a practical solution for storing your boards, but it also adds a touch of personalization to your space. By following the steps outlined in this guide, you can build a stylish surfboard wall rack that will keep your surfboards organized and displayed proudly. So, gather your materials, unleash your creativity, and get ready to showcase your boards with a custom-built surfboard wall rack that’s both functional and aesthetically pleasing.
Related Articles:
- Best Vertical Surfboard Rack
- Best Soft Roof Racks for Surfboards
- best surfboard wall racks
- Best Surfboard Rack for Bike
- To Build a Vertical Surfboard Rack
- To Build a Horizontal Surfboard Rack
As an Amazon Associate I earn from qualifying purchases.
Leave a Reply